

Materials:
- Chloes Creative Cards Summer Flower Cut and Emboss Folder
- Chloes Creative Cards Sugared Pastels Foiled Paper Pad
- Chloes Creative Cards Birthday Sentiment Builder Stamp and Die Set
- Chloes Creative Cards Dazzling Foliage Stamp and Die Set
- Chloes Creative Cards Rose Quartz Pearl Card
- Chloes Creative Cards Rose Quartz Glitter Card
- Chloes Luxury Crystal White Pearl Card
- Chloes Creative Cards Sugared Pastels Bling Box
- WOW Silver Dollar Embossing Glitter
- Wow clear embossing ink pad
- Silver Mirror Card
- Sparkelicious Glitter in Sugared Peach and Put on your Dancing Shoes
- Heat gun
- Art Glitter Dries clear glue
- Die Cutting Machine
- Chloes Creative Cards – 8x8 Basic Circle Die Set
- Score Board.
- Chloes Creative Cards 3mm foam pads on a Roll
- 8" x 8" Base Card

2. Choose two different coloured papers from the Sugared Pastels Paper Pad, trim down to fit and attach with double sided tape.

3. Cut two medium size circles from the Ex Large Circle Die Set using Silver Mirror Card, mat and layer onto the top of each one of these a smaller patterned paper circle cut from the pad.
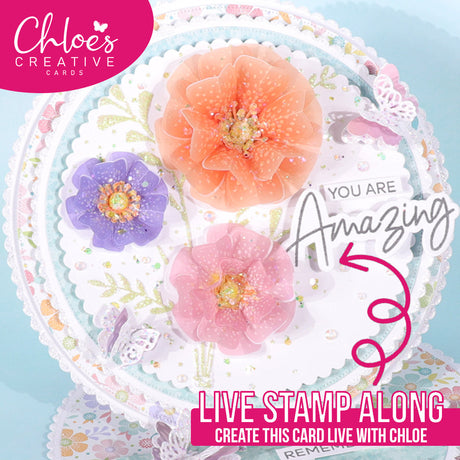
4. Attach one to the front of the card on the fold and the other on to the inside. Cut as many flowers as desired using the Summer Flower Cut and Emboss Folder and Rose Quartz Pearl Card, glitter with Sugared Peach Sparkelicious, when dry shape and mould together and attach a jewel from the Sugared Pastels Bling Box.

5. Stamp, heat emboss and die cut the elements from the Dazzling Foliage Stamp and Die Set using the WOW Silver Dollar Embossing Powder, glitter with Put on your Dancing Shoes and Sugared Peach Sparkelicious and attach the jewels with Art Glitter Glue.
6. Arrange the flowers and foliage around the left-hand side of the circle die cut and the bottom right-hand corner, secure into place with Pinflair.

7. Die cut the words Fabulous and Birthday using the Rose Quartz Glitter Card and attach to the appropriate white die cut secure into place with foam pads.

8. Stamp and heat emboss the words 'Have a' in WOW Silver Dollar Embossing Powder, mat and layer onto a small piece of Rose Quartz Glitter Card and attach with foam pads.

I hope you've enjoyed creating this beautiful card that the wonderful Glynis has made. I can't wait to see you post your creations on Facebook and Instagram.


3 comments
Hi There I love This card… so much so that I have ordered and recieved all the products needed to make it. I saw it a few weeks ago and bingo … I was hooked on Chloes stuff. I have started this one but please can you tell me … the half way fold down the middle of the front at the start of the instructions. please which way does it fold … away from you so its tucked under or towards you so its concertina . or is it choice please, It may sound thick but i want it to be right.. Thank you so much. Kind regards Ann
Simply beautiful, going to try this for Anniversary coming up.
Thanks for great inspiration
Beautiful card. Great inspiration.