Hello Crafters,
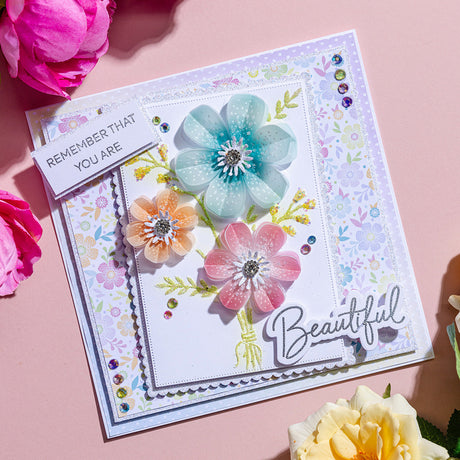
Today's card tutorial by the incredible Christine is the perfect 'just because' card design for when you want to send something to a friend or loved one simply to put a smile on their face. Christine uses the recent Flower Builder collection launch to create this pretty, dimensional layout with a soft pink colourway.
Read on for a full step-by-step project tutorial, complete with a materials list that has been linked so you can click on each product to be sent to its respective web page, making it easy for you to shop.

YOU WILL NEED:
-
Flower Builder collection:
- 3D embossing folder, stamp and die set – Flower Bouquet
- Die and stamp set – Amazing, Beautiful, Lovely Sentiment Builder
- Metal die set – DL Scalloped & Pierced Rectangle
- 8x8” designer paper pad – Pastel Rainbow Delight
- Vellum paper pad – Flower Ombré
- 8x8” Pierced and Scalloped dies – Squares
- Pearl card – Crystal White
- Matt mirror card – Rose Quartz
- Sparklers – 10mm and 12mm
- Chloe’s Creative Cards Floral Sequins – Pinks
- Self-Adhesive Sparkles – Glorious Greens
- Sparkelicious glitter – Crystallina
- WOW! embossing powder – Rosewater, Minty, and Clear Sparkle
- WOW! clear embossing inkpad
- WOW! embossing pen
- Chloe’s Creative Cards chisel-tip glue pen
- Pinflair 3D glue gel
- Art Glitter dries-clear PVA glue
- 8x8” white straight-edged card blank
- WOW! heat tool
- A4 die-cutting machine
INSTRUCTIONS:
1 Create a scalloped card blank using the largest die from the Pierced and Scalloped Squares die set. Using the same die, cut a sheet of Rose Quartz matt mirror card and affix to the card blank using foam pads.
2 Trim Crystal White pearl card to 7⅜” and pink patterned paper from the Pastel Rainbow Delight paper pad to 7⅛”. Edge both with Crystallina Sparkelicious glitter and adhere to the card front using foam pads. Die-cut two panels from Crystal White pearl card using the third-largest DL Pierced and Scalloped die and two panels from pink floral paper from the Pastel Rainbow Delight paper pad using the fourth-largest die from the same set. Edge both with Crystallina Sparkelicious glitter and then matt and layer onto the card front with foam pads approximately 1cm in from each side, as shown. Die-cut a sheet of Rose Quartz matt mirror card using the fourth-largest Pierced and Scalloped die and then affix to the card front with foam pads at an angle, as shown.
3 Die-cut Crystal White pearl card using the fifth-largest die from the Pierced and Scalloped Squares die set and emboss using the Flower Bouquet embossing folder. Coat the embossed leafy foliage and branches with embossing ink using the WOW! embossing pen as you would a marker pen, then cover with Minty embossing powder and heat set. Do this one branch at a time so the ink doesn’t dry before you cover with the powder. Edge with Crystallina Sparkelicious glitter and affix to the card front using foam pads.
4 Stamp three large six-petal pink flowers, four medium pink flowers and four small pink flowers from the Flower Ombré vellum paper pad with clear embossing ink. Cover with Clear Sparkle embossing powder and heat set. Die-cut the flowers using the corresponding dies and add Crystallina Sparkelicious glitter around the edges of each petal using the chisel-tip glue pen. Layer up the flowers using 3D glue gel, as shown.
5 Die-cut three stamens from pink patterned paper from the Pastel Rainbow Delight paper pad using the stamen die from the Flower Bouquet set. Add tiny green sparkles to the tip of each stamen and attach to the centre of each flower using 3D glue gel. Add a 12mm Sparkler to the centre of the large and medium flowers and a 10mm Sparkler to the centre of the small flower using 3D glue gel. Affix the flowers to the card front, as shown, using 3D glue gel.
6 Using the Sentiment Builder die and stamp set, die-cut the word ‘beautiful’ from Crystal White pearl card and the corresponding outline from pink patterned paper from the Pastel Rainbow Delight paper pad. Affix the word ‘beautiful’ to the die-cut outline using dries-clear glue. Using the same die and stamp set, stamp the word ‘hello’ onto Crystal White pearl card using a clear embossing inkpad. Cover with Rosewater embossing powder and heat set. Matt and layer onto pink patterned paper and affix both parts of the sentiment to the card front using foam pads. Add Pink Floral sequins and Glorious Greens sparkles to finish.


Remember to share your creations on our Facebook and Instagram pages and follow us to keep up to date with all the latest news and collections.
Chloe x


