Hello Crafters,
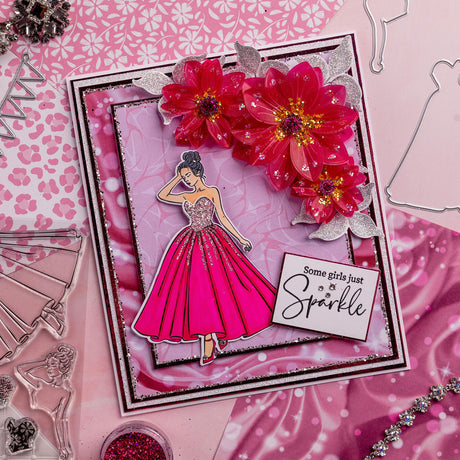
We have a pretty, dimensional floral birthday card tutorial for you today, made by our talented Rebecca! Using the brand-new Flower Builder collection, Rebecca has created this stunning card layout that will surely put a smile on the recipient's face.
Read on for a full step-by-step project tutorial, complete with a materials list that has been linked so you can click on each product to be sent to its respective web page, making it easy for you to shop.

YOU WILL NEED:
- Flower Builder collection:
- 5x7” 3D embossing folder, stamp and metal die set – Flower Swirl
- Die and stamp set – Amazing, Beautiful, Lovely Sentiment Builder
- 8x8” designer paper pad – Pastel Rainbow Delight
- 5x7” printed vellum – Flower Ombre
- Smooth white card
- Silver mirror card
- Sparkelicious glitter – Crystal Crush and Lemon Drop
- WOW! embossing powder – Metallic Silver Superfine
- Sparklers – 10mm and 12mm
- Bling Box refills – Sugared Lilac
- Bling Box – Beautiful Bouquets
- Orange alcohol maker
- White organza ribbon
- WOW! clear embossing inkpad
- Ranger Distress Oxide inkpads – Bundled Sage, Kitsch Flamingo, Dried Marigold
- Foam pads on a roll
- Chisel-tip glue pen
- Pinflair 3D glue gel
- Art Glitter dries-clear glue with a fine-tip applicator
- 8x8” white straight-edged card blank
- WOW! heat tool
- Die-cutting machine
INSTRUCTIONS:
1 Trim patterned paper to 7¾” square and affix to the card blank using dries-clear glue. Trim white card to 7¼” square, edge with a chisel-tip glue pen, then cover in Crystal Crush Sparkelicious glitter. Once dry, affix to the card using foam pads. Trim a sheet of patterned paper to 7” square and affix to the card using dries-clear glue. Trim white card to 6½” square and edge with Crystal Crush Sparkelicious glitter. Trim patterned paper to 6¼” square, then matt onto the white panel. Affix to the card using foam pads.
2 Create a 5x7” white cardstock panel and run through the embossing folder. Ink over the swirls using Bundled Sage Distress Oxide ink. Matt and layer onto another panel of white card and edge with Crystal Crush Sparkelicious glitter. Run another piece of white card through the embossing folder, then ink the flowers using Kitsch Flamingo and Dried Marigold ink. Die-cut the flowers using the corresponding dies. Shape by creating a valley fold down the centre of each petal and affix to the panel using 3D glue gel
3 Take a sheet from the vellum pad and stamp out the coordinating stamps for each flower using a clear embossing inkpad and heat-emboss using Opaque Bright White embossing powder. Shape the petals by creating a valley fold down the centre of each. Add dots of dries-clear glue and cover with Lemon Drop Sparkelicious glitter. Affix to the card using 3D glue gel. Die-cut two stamens from white card, then ink using Dried Marigold Oxide inkpad and add to the centres of the larger flowers. Add a sparkler to the centre of each flower.
4 Stamp out ‘have a’ and ‘birthday’ onto white card using a clear embossing inkpad, heat-emboss using Metallic Silver Superfine embossing powder, then trim around. Die-cut the word ‘lovely’ from silver mirror card and the outer layer from white card and adhere together using dries-clear glue. Affix all to the card using foam pads.
5 Tie a triple bow and affix to the top corner of the card using 3D glue gel. Colour a sparkler using an alcohol marker and affix to the centre of the bow using 3D glue gel. Add three crystals to the remaining corners to finish.


Remember to share your creations on our Facebook and Instagram pages and follow us to keep up to date with all the latest news and collections.
Chloe x