Hello Crafters,
Earlier today, I hosted my first Stamp-Along of the year and I had so much fun!
If you missed it, don't worry, I'm here to give you a quick round-up, including links to the downloadable and printable project sheet, the materials you'll need, the written instructions, and then also the video itself!
First thing's first, here's the video you'll need to follow. But please read on as below the video you'll find more information plus the materials/instructions!
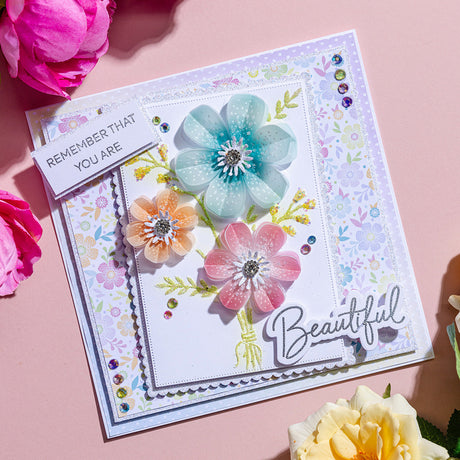
Here's a close-up image so that you can see in detail the kind of techniques used, plus the intricacy of the floral die panels - it's beautiful, isn't it?


Materials:
- Chloe’s Creative Cards metal die set – Floral Lace Border
- Chloe’s Creative Cards metal die set – Floral Lace Diamond
- Chloe’s Creative Cards Christmas Magnolia stamp and die set
- Chloe’s Creative Cards Dazzling Foliage stamp and die set
- Chloe’s Creative Cards Birthday Sentiment Builder stamp and die set
- 2 x 8x8” White Straight Edge Card Blanks
- Chloe’s Creative Cards 8x8” Designer printed paper pad – Floral Dreams
- Chloe’s Creative Cards mirror card – Lagoon
- Craft UK A4 white smooth card
- Sparkelicious Glitter – Crystallina, Diamante Sparkle, and Jazzy Jade
- Chloe’s Creative Cards Bling Box – Spring Collection
- WOW! embossing glitter – Uptown
- WOW! clear embossing inkpad
- Tim Holtz Distress Oxide inkpad – Peacock Feathers
- Heat-resistant acetate
- Cut’n’Dry Foam/blending tool
- Double-sided adhesive sheet
- Chloe’s Creative Cards Chisel-Tip Glue Pen
- Pinflair 3D glue gel
- Art Glitter Dries-Clear PVA glue
- Foam pads on a roll
Instructions:
1 Take your two card blanks, measure halfway across the front of both and cut down the middle. Stick both card blanks together to create a gatefold-style card.
2 Cut two strips of teal patterned paper to 3¾x7¾”, edge with a chisel-tip glue pen, cover with Crystallina Sparkelicious glitter, and affix to the base card.
3 Trim two strips of Lagoon mirror card to 3¼x7¼” and affix to the base card using foam pads. Cut two 3x7” strips of teal paper, then cut two strips of white cardstock to 2¾x6¾”. Place the Floral Lace Border die in the centre of the white strips and cut.
4 Place a strip of double-sided adhesive paper behind the die-cut image, remove the backing and affix to the teal paper strips. Cover with Crystallina Sparkelicious glitter to create a glittery background.
5 Edge teal paper with a chisel-tip glue pen, cover with Crystallina Sparkelicious glitter and affix to the base card using foam pads.
6 Stamp four large Christmas Magnolias and four medium Christmas Magnolias onto teal patterned paper using a clear embossing inkpad, cover with Uptown embossing glitter and heat to set. Fussy cut or die-cut the flowers.
7 Ink the centres of the flowers using Peacock Feathers and a piece of Cut’n’Dry foam. Allow ink time to dry then apply dots of PVA glue to the centres of the petals and cover with Crystallina glitter.
8 Allow the glue to dry, then pinch the petals down the centre to create a valley fold. Layer two large flowers together, affixing in the centre with 3D glue gel. Repeat so you have two large flowers. Layer two medium flowers together, affixing in the centre with 3D glue gel. Repeat so you have two medium flowers.
9 Stamp two large and two medium flowers onto heat-resistant acetate using a clear embossing inkpad, cover with Uptown embossing glitter and heat to set. Cut out the flowers. Apply dots of PVA glue to the centre of the petals and cover with Crystallina Sparkelicious glitter.
10 Die-cut four stamen from white cardstock, apply dots of PVA glue to the edges of the stamen, and cover with Jazzy Jade Sparkelicious glitter.
11 Pull the petals up on the acetate layers and affix in the centres of the flowers using 3D glue gel. Apply a dot of 3D glue gel to the back of the stamen and affix in the centre of the flower. Add a jewel to the centre of each of the flowers too. Attach the flowers to the base card, as shown, using 3D glue gel.
12 Stamp two Dazzling Foliage strands onto heat-resistant acetate using a clear embossing inkpad, cover with Uptown embossing glitter, and heat to set. Cut out the foliage, apply dots of PVA glue and cover with Diamante Sparkle embossing glitter. Affix the foliage behind the flowers using 3D glue gel.
13 Die-cut plain diamonds from white cardstock, edge the largest layer using a chisel-tip glue pen and cover with Crystallina Sparkelicious glitter. Die-cut the Fancy Diamond from teal paper. Layer the diamonds together and affix in the centre of the card.
14 Finally, stamp ‘Birthday’ and ‘Wishes’ onto white cardstock using a clear embossing inkpad, cover with Uptown embossing glitter and heat to set. Cut out the sentiment and affix in centre of card using foam pads.
If you want to get ahead, here's what you can have prepped ready before the Stamp-Along:
- Any die-cutting.
- Cut the following matts and layers to size:
Teal patterned paper: 3¾x7¾” (x2), 3x7" (x2)
Lagoon mirror card: 3¼x7¼” (x2)
White cardstock: 2¾x6¾” (x2) - If you'd like to get a little further ahead, you could stamp and emboss the elements ahead of time too.
DOWNLOAD THE INSTRUCTION SHEET HERE

I'd love to see your makes, so don't forget to share them on the Chloe's Creative Cards Facebook Group!


