Hello Crafters,
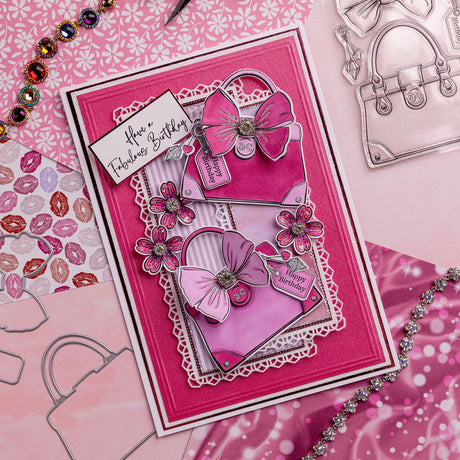
Handbag lovers unite for today's card tutorial by the talented DT member, Glynis! Using a bright pink colour palette and featuring items from the new Chic Boutique collection, this card is the perfect design for those who can never have enough bags!
Read on for a full step-by-step project tutorial, complete with a materials list that has been linked so you can click on each product to be sent to its respective web page, making it easy for you to shop.

YOU WILL NEED:
- Chic Boutique collection:
- Stamp and die set – Glamourous Handbag
- Stamp set – Fashionable Birthday
- 8x8” designer paper pad – Chic Boutique
- Nesting die set – Decorative DL
- Stamp and die set – Flower Swirl
- Mirror card – Azalea
- Pearl card – Azalea
- Smooth white card
- Sparkelicious glitter – Crystallina, Diamante Sparkle, Silver Frost, and Rosy Glow
- WOW! embossing powder – Clear Gloss
- Versafine Clair Black inkpad
- Assorted pink marker pens
- Sparklers – 10mm and 12mm
- Foam pads on a roll
- Art Glitter Dries-Clear PVA glue
- Pinflair 3D glue gel
- 7x10” white straight-edged card blank
- WOW! heat tool
- Scoreboard
- Die-cutting machine
INSTRUCTIONS:
1 Cut three different size matts to fit the base card from Azalea mirror card, white card and Azalea pearl card. Glitter the edges of the white card using Crystallina Sparkelicious glitter. Place the Azalea pearl card onto a large scoreboard and score two lines on the four sides. Matt and layer the three panels together and affix to the base card.
2 Using the DL decorative die set, cut numbers one and two in white card and go around the sides with Crystallina Sparkelicious glitter. Die-cut the second and fourth dies using Azalea mirror card and secure into place. For the tops of these two layers, trim down sheets of patterned paper from the Chic Boutique paper pad, glitter around the sides using Diamante Sparkle Sparkelicious glitter, and adhere both layers to the base card using foam pads.
3 Stamp, heat-emboss and die-cut the Glamour Handbag four times onto white card using Versafine Clair Black ink and Clear Gloss embossing powder. Fully colour in two of them in different shades of pink. Using the other two images, colour the corners, fasteners and handles, then fussy cut and attach to the main handbags using glue gel for a 3D effect. Decorate with Silver Frost Sparkelicious glitter. Stamp, heat-emboss and die-cut the large bows and tags. Colour and glitter with Crystallina and Silver Frost Sparkelicious glitter, then secure in place along with 12mm Sparklers (for the bows) using glue gel.
4 Stamp, heat-emboss and die-cut the small flowers from the Flower Swirl stamp and die set. Colour and glitter using Rosy Glow Sparkelicious glitter. Secure a 10mm Sparkle into the middle of each one and affix to the base card with glue gel.
5 Stamp and heat-emboss the sentiment from the Fashionable Birthday stamp set onto white card. Matt and layer onto mirror card and affix with foam pads to finish.


Remember to share your creations on our Facebook and Instagram pages and follow us to keep up to date with all the latest news and collections.
Chloe x