Hello Crafters,
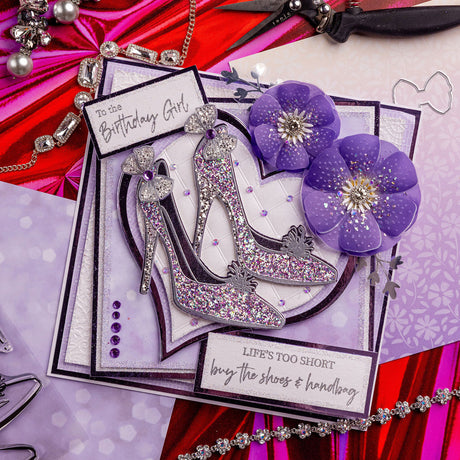
Today's glamourous card tutorial by the brilliant Christine features the brand-new Chic Boutique collection. Keeping to a stylish lilac colour scheme, Christine has combined glitzy heels and delicate vellum flowers with spectacular results.
Read on for a full step-by-step project tutorial, complete with a materials list that has been linked so you can click on each product to be sent to its respective web page, making it easy for you to shop.

YOU WILL NEED:
- Chic Boutique collection:
- Stamp and die set – Chic Shoe
- Stamp set – Fashionable Birthday
- 3D embossing folder – Lattice Background
- 8x8” designer paper pad – Chic Boutique
- Scalloped and pierced nesting die sets – Squares and Ovals
- Embossing folder, stamp and die set – Flower Swirl
- Stamp and die set – Fresh Foliage
- Pearl card – Crystal White
- Mirror card – Amethyst
- Printed vellum pad – Flower Ombre
- Sparkelicious glitter – Silver Frost, Lemon Sorbet, Silver Crystal, Crystallina, and Blueberry Sorbet
- WOW! embossing powder – Clear Gloss and Polished Silver
- WOW! clear embossing inkpad
- Ranger Distress Oxide inkpad – Shaded Lilac
- Versafine Clair inkpad – Black
- Self-adhesive Sparkles – Pretty Purples
- Sparklers - 10mm and 12mm
- Bling Box – Spring Collection
- Marker pens
- Foam pads on a roll
- Pinflair 3D glue gel
- Art Glitter Dries-clear PVA glue
- 8x8" white straight-edged card blank
- WOW! heat tool
- Die-cutting machine
INSTRUCTIONS:
1 Trim down a sheet of Amethyst mirror card and adhere to the base card. From the Scalloped and Pierced Square die set, cut numbers one and three in white card and then glitter the edges using Crystallina Sparkelicious glitter. Die-cut numbers two and four in Amethyst mirror card and then matt onto the appropriate scalloped die-cut panel.
2 Using the Chic Boutique paper pad, trim down two different sheets of paper to match the two layers from Step 1. Go around the edges of each panel using Silver Crystal Sparkelicious glitter and then attach to the corresponding matt and layered panels. Using foam pads, affix the complete matt and layered panel onto the base card.
3 Die-cut a medium-size pierced oval using the Scalloped and Pierced Oval die set. Colour with the Shaded Lilac Oxide inkpad and emboss using the Lattice Background embossing folder. Go around the oval with Silver Gilt Sparkelicious glitter. Matt and layer onto a scalloped-edged die-cut panel, glittering the edges first with Crystallina Sparkelicious glitter, and attach to the base card with foam pads.
4 Stamp, heat-emboss and die-cut the Chic Shoe. Colour with the marker pens and glitter with Silver Frost Sparkelicious glitter. Stamp, heat-emboss and die-cut the small bow. Colour and glitter, as before, with the shoe, then secure in place with Pinflair glue gel, adding a jewel from the Spring Collection Bling Box. Use foam pads to attach the shoes to the base card.
5 From the Flower Ombre vellum pad, tape three sheets together at the top and bottom so as not to slip, and die-cut using the Flower Swirl die set. Secure the flowers inside the Flower Swirl embossing folder using masking tape (keeping the three same-size die-cuts together) and emboss. This will save you from having to do three separate passes - three for the price of one! Glitter with Blueberry Sorbet and Lemon Sorbet Sparkelicious glitter, shape the petals and adhere with Pinflair glue gel. Colour the 10mm and 12mm Sparkles with a marker pen and affix them to the middle of each flower.
6 Stamp, heat-emboss, and die-cut the foliage from the Fresh Foliage stamp and die set using Polished Silver embossing powder. Then, secure the flowers and foliage using glue gel.
7 Stamp and heat-emboss the sentiment using Versafine Clair Black ink onto white card. Matt and layer onto mirror card and secure in place with foam pads. Decorate the lattice background using Pretty Purples Self-Adhesive Sparkles to finish.


Remember to share your creations on our Facebook and Instagram pages and follow us to keep up to date with all the latest news and collections.
Chloe x