Hello Crafters,
We have an excellent tutorial for you today designed specifically for a girl turning 18 but could easily be adapted for any age. It uses a combination of items from the new Chic Boutique collection, and we're sure you will agree with us when we say our DT member Christine has done a magnificent job!
Read on for a full step-by-step project tutorial, complete with a materials list that has been linked so you can click on each product to be sent to its respective web page, making it easy for you to shop.

YOU WILL NEED:
- Chic Boutique collection:
- 5x7” 3D embossing folder – Lattice Background
- Photopolymer stamp set – Fashionable Birthday
- Die and stamp set – Glamourous Handbag
- Metal die set – Large Numbers
- 8x8” embossing folder – Lace Background
- 8x8” designer paper pad – Chic Boutique
- 8x8” Pierced and Scalloped dies – Squares and Rectangles
- 5x7” 3D embossing folder, stamp and metal die set – Flower Bouquet
- Pearl card – Crystal White and Rose Quartz
- Designer printed vellum pad – Flower Ombré
- Mirror card – Gold
- Foiled acetate – Fabulous Foliage
- Heat-resistant acetate
- Sparklers – 10mm and 12mm
- Self-Adhesive Sparkles – Pretty Pinks
- WOW! clear embossing inkpad
- WOW! embossing powder – Polished Gold Super Fine, Opaque Bright White Super Fine, and Clear Gloss Super Fine
- Sparkelicious Glitter – Crystallina, Pink Perfection, Chunky Crystallina, and Unicorn Sparkle
- Double-sided adhesive sheets
- Chisel-tip glue pen
- Pinflair 3D glue gel
- Art Glitter Dries-Clear PVA glue
- 8x8” white straight-edged card blank
- WOW! heat tool
- A4 die-cutting machine
INSTRUCTIONS:
1 Create a scalloped card blank using the largest die from the Pierced and Scalloped Squares die set. Cut a panel from Rose Quartz pearl card using the same die, then edge with Crystallina Sparkelicious glitter and affix to the card blank using foam pads. Create a gold mirror card panel using the second-largest die from the Pierced and Scalloped die set and attach to the card front using foam pads. Trim a sheet of floral-patterned paper from the Chic Boutique paper pad to 7x7”, edge with Crystallina Sparkelicious glitter and affix to the card front with foam pads.
2 Die-cut a sheet of Rose Quartz pearl card using the fourth-largest die from the Pierced and Scalloped die set, edge with Crystallina Sparkelicious glitter, and affix to the card front at an angle, as shown, using foam pads. Die-cut a sheet of gold mirror card using the fifth-largest die from the Pierced and Scalloped Squares die set and attach to the card front using foam pads. Trim Crystal White pearl card to 5¼” square, emboss using the 8x8” Lace Background embossing folder, edge with Crystallina Sparkelicious glitter and affix to the card front using foam pads.
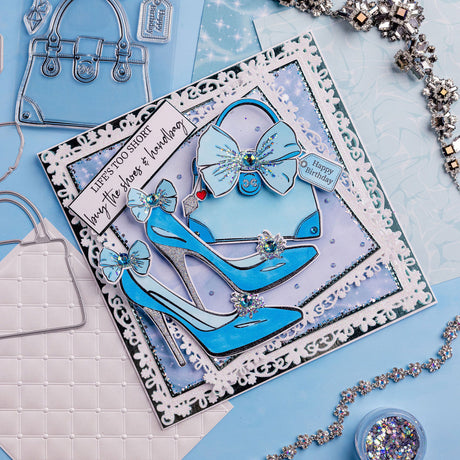
3 Using the handbag image from the Glamourous Handbag stamp set, stamp onto gold mirror card using the clear embossing inkpad. Cover with Clear Gloss Super Fine embossing powder and heat set. Stamp the handbag image again onto Crystal White pearl card, cover with Polished Gold Super Fine embossing powder and heat set. Die-cut both pieces using the corresponding dies from the same set. Emboss the gold mirror handbag using the 5x7” Lattice Background embossing folder. Fussy cut the corners and the top section, including the strap, from the Crystal White handbag and affix the pieces to the gold mirror handbag, as shown, using dries-clear adhesive. Add touches of Pink Perfection Sparkelicious glitter to the handbag strap and buckles using dries-clear adhesive. Add Pretty Pinks sparkles to the quilted bag seams.
4 Stamp the Happy Birthday tag and decorative dangles onto gold mirror card using the clear embossing inkpad. Cover with Opaque Bright White Super Fine embossing powder and heat set. Die-cut both elements using the corresponding dies from the same set. Attach both to the left strap of the bag with a 12mm Sparkler on top, as shown, using glue gel.
5 Stamp the large bow from the Glamourous Handbag die and stamp set onto heat-resistant acetate using the clear embossing inkpad. Cover with Opaque Bright White Super Fine embossing powder and heat set. Using dries-clear adhesive, coat the reverse of the bow with Pink Perfection Sparkelicious glitter and, once dry, adhere to the right strap of the handbag, as shown, with glue gel. Add a 12mm Sparkler to the centre of the bow using glue gel.
6 Die-cut three large and medium pink flowers from the Flower Ombré vellum pad. Emboss the flowers using the 5x7” 3D Flower Bouquet embossing folder. Add dots of dries-clear adhesive to the embossed details on each petal and cover with Chunky Crystallina Sparkelicious glitter. Layer the flowers using glue gel to give one large and one medium flower. Die-cut two pieces of Crystal White pearl card using the stamen die from the Flower Bouquet embossing folder, stamp and metal die set. Add pink self-adhesive sparkles to the tips of the stamens and affix to the centre of each flower using glue gel. Add a 12mm Sparkler to the centre of the large flower and a 10mm sparkler to the medium flower using glue gel. Affix the flowers to the card front, as shown, using glue gel.
7 Fussy cut two leafy branches from the Fabulous Foliage foiled acetate. Add dots of dries-clear adhesive to the tips of each branch and cover with Unicorn Sparkle Sparkelicious glitter. Affix to either side of the flowers using glue gel.
8 Die-cut gold mirror card using the numbers 1 and 8 from the Large Numbers metal die set. Affix a doubled-sided adhesive sheet to white cardstock and die-cut using the same numbers. Remove the protective top layer from the adhesive sheet and cover with Pink Perfection Sparkelicious glitter. Adhere to the gold mirror numbers using dries-clear adhesive to create a drop shadow effect, as shown. Affix to the card front using dries-clear adhesive.
9 Die-cut a piece of Rose Quartz pearl card using the second-smallest die from the Pierced and Scalloped Rectangles die set. Edge with Crystallina Sparkelicious glitter. Cut a piece of Crystal White pearl card using the smallest die from the same set. Stamp the sentiment using a clear embossing inkpad. Cover with Polished Gold Super Fine embossing powder and heat set. Edge with Crystallina Sparkelicious glitter. Matt and layer together and affix to the top right of the card front, as shown, using foam pads.


Remember to share your creations on our Facebook and Instagram pages and follow us to keep up to date with all the latest news and collections.
Chloe x