Hello Crafters,
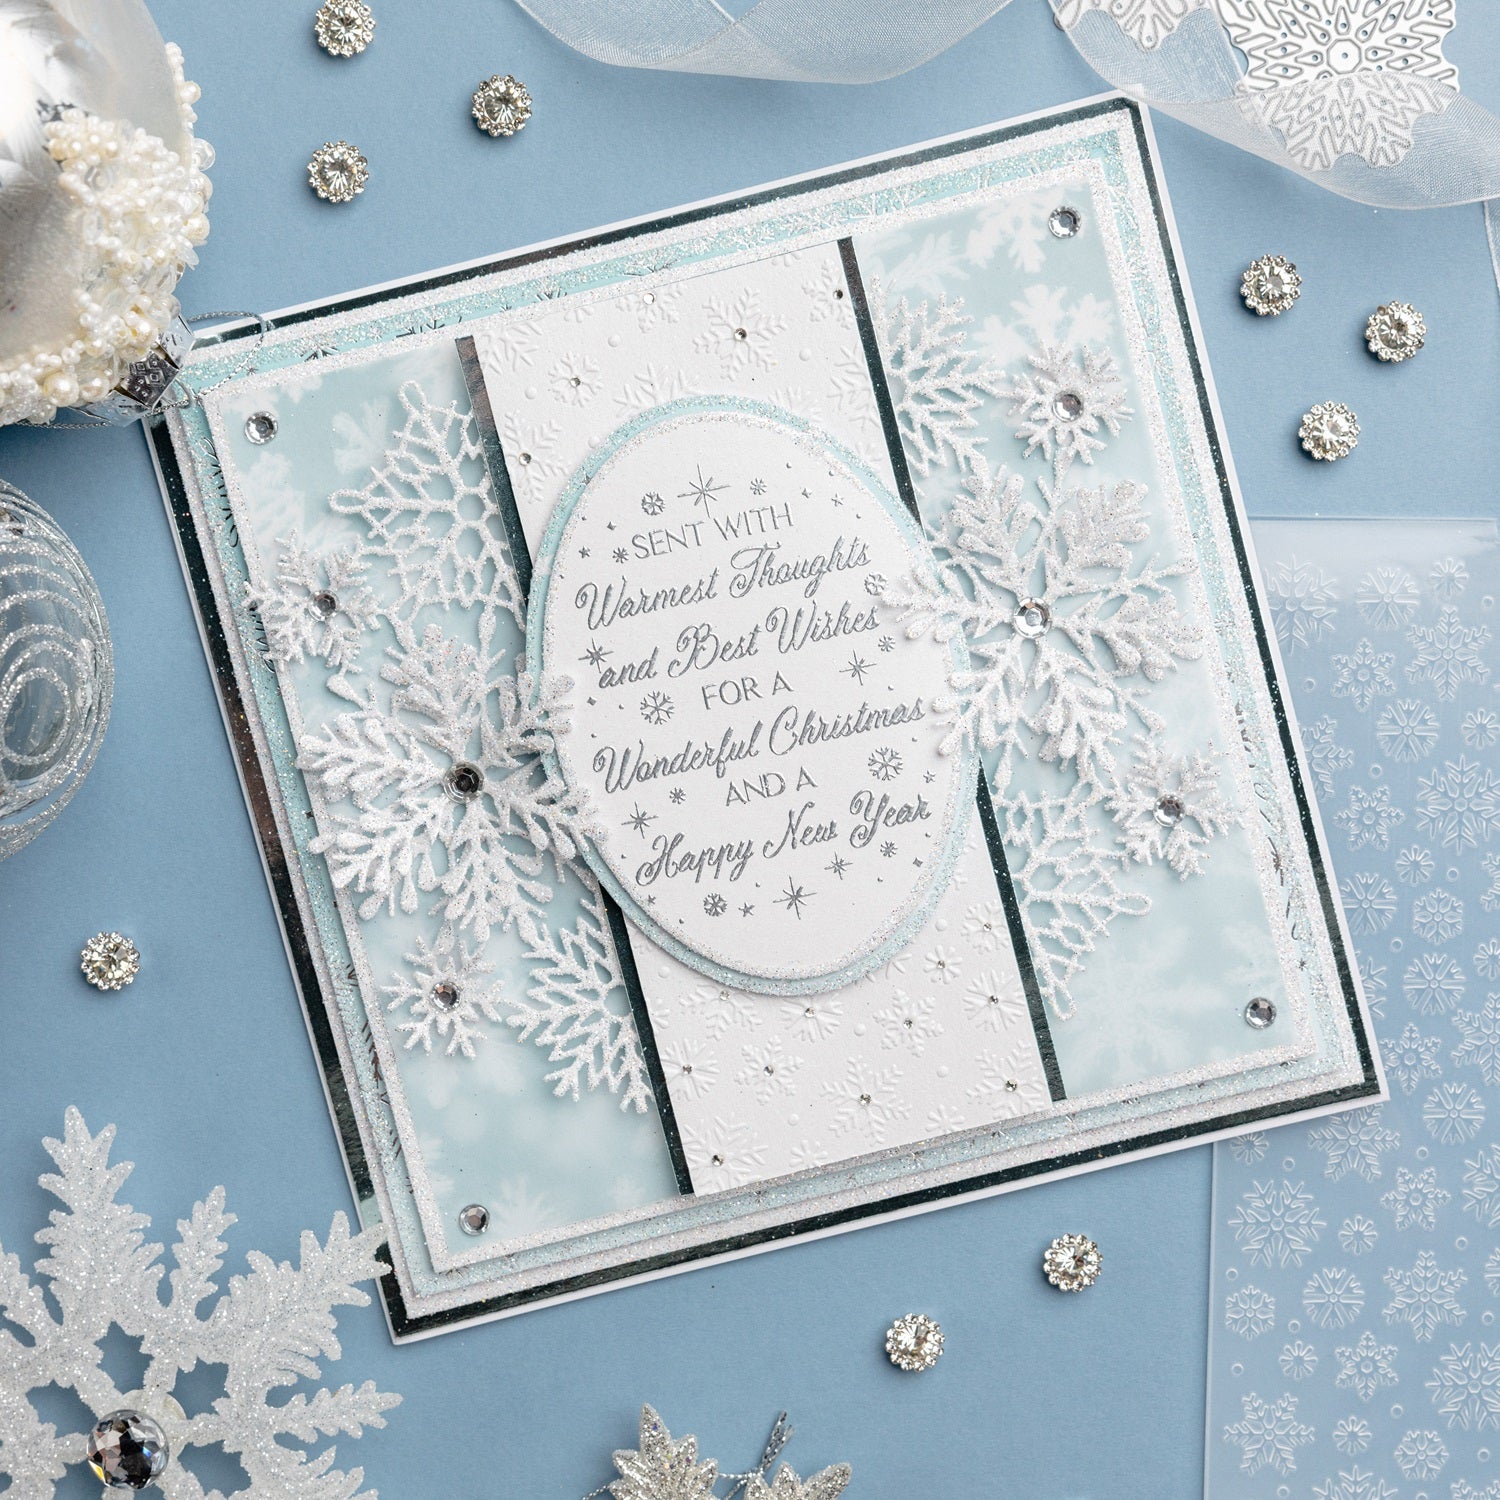
Today, we have an extra-special card tutorial for you, created by the talented Christine. This elegant design is not only perfect for luxurious Christmas cards, but with a simple change of the centre sentiment, could also work brilliantly for a winter wedding invite. Christine has used the brand-new Winter Wonderland collection for this card, with the gorgeous On the Edge Snowflakes die and the sentiment stamp being the main focus. What makes this tutorial so extra-special is that we've included a FREE project sheet for you to download and keep! To access the PDF tutorial sheet, head to the link at the bottom of the page.
Read on for a full step-by-step project tutorial, complete with linked materials list.

YOU WILL NEED:
- Winter Wonderland collection:
- On the Edge Snowflakes die set
- Warmest Thoughts and Best Wishes A7 stamp set
- Winter Wonderland 8x8” foiled paper pad
- Snowflake Flurry designer printed vellum
- 8x8” embossing folder – Blizzard
- 8x8” nesting dies – Basic Ovals
- Pearl card – Crystal White
- Mirror card – Aquamarine
- Bling Box – Elegant Christmas
- WOW! clear embossing inkpad
- WOW! embossing powder – Polished Silver Super Fine
- Sparkelicious glitter – Crystal Crush
- Foam pads on a roll
- Chisel-tip glue pen
- Art Glitter Dries-Clear PVA glue
- Nail art gems
- 8x8” white straight-edged card blank
- WOW! heat tool
- Die-cutting machine
INSTRUCTIONS:
1 Trim the Aquamarine mirror card to 7¾” square and affix to the card blank using foam pads. Trim a sheet of Crystal White pearl card to 7½” square, edge with Crystal Crush Sparkelicious glitter, and affix to the card front using foam pads. Trim a sheet of snowflake-patterned paper from the Winter Wonderland paper pad to 7¼” square and edge with Crystal Crush Sparkelicious glitter. Affix to the card front using foam pads. Trim another sheet of Crystal White pearl card to 6¾” square, edge with Crystal Crush Sparkelicious glitter, and affix to the card front using foam pads.
2 Trim a sheet of snowflake vellum from the Snowflake Flurry vellum pack to 6½” square. Affix to the card front by using a small dot of dries-clear adhesive in each corner, add an Elegant Christmas Bling Box gem to each corner of the vellum to cover the dots made from the glue.
3 Cut four panels of Crystal White pearl card using the On the Edge Snowflakes die, leaving two of the die-cut panels intact. Snip into the other two die-cut panels to release the largest central snowflake and the two smallest, giving you two large and four small individual snowflakes. Using the chisel-tip glue pen, cover the snowflake panels and the snipped snowflakes with Crystal Crush Sparkelicious glitter.
4 Trim a piece of Aquamarine mirror card to 3x6½”. Using dries-clear adhesive, attach the two intact snowflake panels to the underneath of the mirror card, around 2cm in from the edge should be just enough to adhere to the card while leaving most of the snowflake design exposed on either side, as shown. Add foam pads to the reverse of the mirror card panel and affix to the centre of the card front using foam pads, as shown. Attach the two large and four small fussy-cut snowflakes to the corresponding snowflakes on the panels, as shown, using dries-clear adhesive. Add Elegant Christmas Bling Box diamanté gems to the centres.
5 Trim a piece of Crystal White pearl card to 2¾x6½” and emboss using the Blizzard embossing folder. Add nail art gems to the centre of the snowflakes and attach to the card front, as shown. Die-cut an Aquamarine mirror card panel using the tenth-smallest die from the Basic Ovals die set and affix to the centre of the embossed panel on the card front using foam pads.
6 Die-cut a piece of Crystal White pearl card using the ninth-smallest Basic Ovals die. Stamp the sentiment using the clear embossing inkpad, cover with Polished Silver Super Fine embossing powder and heat set. Edge with Crystal Crush Sparkelicious glitter and affix to the card front, as shown, using foam pads.


I hope you've found this stylish and elegant Christmas card tutorial by Christine informative and that it's inspired you to create your own version!
FREE PROJECT SHEET!
To access and download your FREE project sheet, simply click on the image below!

Remember to share your creations on our Facebook and Instagram pages and follow us to keep up to date with all the latest news and collections.
Chloe x


1 comment
Love the Chloe’s stuff….addicted to it ….🎉🎉🎉🎉