Hello Crafters,
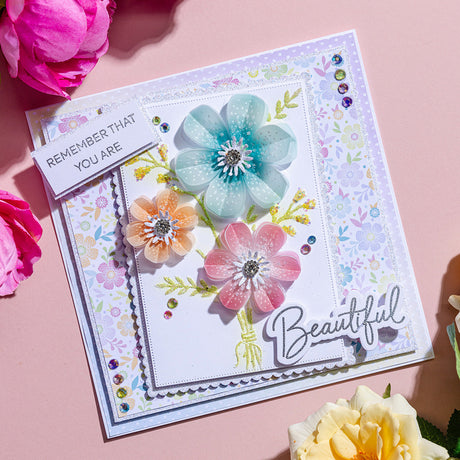
Sometimes, receiving a card for no other reason than to make you smile can have a huge impact not only on your day but your whole outlook, and this is why today's card tutorial by DT member extraordinaire Rebecca is so special. Using the 'Sending You a Little Sunshine' stamp set from the newly-launched Statement Sentiments collection with a happy yellow colour scheme, Rebecca has created this cheery card that will brighten up anyone's day.
Read on for a full step-by-step project tutorial, complete with full materials list. To view the product page for each individual product, simply click on the product name and you'll be directed to its dedicated page.

YOU WILL NEED:
- 8x8” Fancy Decagon nesting dies
- Statement Sentiments stamps – Sending You a Little Sunshine
- Flower Power metal die
- Swirly Foliage metal die
- Stamen metal die
- Summer Florals 8x8” paper pad
- Pastel Sorbet printed paper pad
- Watercolour Washes vellum
- Sparkelicious glitter – Mexican Sunrise, Crystallina, Lemon Sorbet
- WOW! embossing powder – Polished Gold Superfine
- Pearl card – Crystal White
- Bling Box – Leafy Lace and Beautiful Bouquets
- Floral Sequins – Floral Sparkle
- Ranger Distress Oxide inkpad – Shabby Shutters
- WOW! clear embossing inkpad
- Versafine Onyx Black inkpad
- Art Glitter Dries-clear glue with fine-tip applicator
- Pinflair 3D glue gel
- Chloe’s Creative Cards chisel-tip glue pen
- Foam pads on a roll
- 8x8” white straight-edged card blank
- WOW! heat tool
- Die-cutting machine
INSTRUCTIONS:
1 Trim a sheet of orange printed paper to 7¾” square and edge with glue using a chisel-tip glue pen then cover in Crystallina Sparkelicious glitter. Affix to the card blank using dries-clear glue. Trim a sheet of patterned paper to 7½” square and affix to the card using foam pads. Trim a sheet of Crystal White pearl card to 7” square and edge in Crystallina Sparkelicious glitter. Affix to the card using foam pads. Cut another piece of printed paper to 6¾” square and edge in Crystallina Sparkelicious glitter. Affix to the card using dries-clear glue. Finally, trim a piece of patterned paper to 6¼” square and affix to the card using foam pads.
2 Die-cut the Fancy Decagon die from Crystal White pearl card. Stamp out the ‘sending you a little sunshine’ sentiment using the clear embossing inkpad, then heat-emboss using Polished Gold Superfine embossing powder. Die-cut the next Fancy Decagon die up from orange printed paper, apply a thick border of dries-clear glue and cover in Mexican Sunrise Sparkelicious glitter. Once dry, add both layers to the card using foam pads. Infill the word ‘sunshine’ on the sentiment using dries-clear glue and cover in Mexican Sunrise Sparkelicious glitter. Add sequins to the background.
3 Die-cut three large, three medium, and three small flowers from Watercolour Washes vellum. Shape by creating a valley fold down the centre. Layer a size of each together using 3D glue gel, then add dots of glue to the centre and cover in Mexican Sunrise Sparkelicious glitter. Affix to the card using 3D glue gel.
4 Die-cut three stamens from Crystal White pearl card. Add dots of glue to the edges and cover in Lemon Sorbet Sparkelicious glitter. Affix to the centre of the flowers. Add a rhinestone to the middle. Die-cut some foliage from white cardstock and colour using Shabby Shutters Distress Oxide ink. Carefully tuck in behind the flowers. To finish, add a few pearls to the corner.


I hope you've found this bright and cheery card tutorial informative and that it's inspired you to create your own version!
Remember to share your creations on our Facebook and Instagram pages and follow us to keep up to date with all the latest news and collections.
Chloe x


1 comment
Beautiful card love these new stamps sometimes this is all you need to say to brighten someone’s day and the flowers just finish it off . Thank you Rebecca 😊