- Chloes Creative Cards Metal Die Set - 8 x 8 Fancy Ovals
- Chloes Creative Cards Summer Meadows 8x8 Printed Paper Pad
- Chloes Creative Cards Delightful Daisy Stamp and Die Set
- Chloes Creative Cards Sentiment Borders Stamp and Die Set
- Sparkelicious Glitter in Razzle Dazzle, Crystallina, Put on your Dancing Shoes and Disco Fever
- WOW Metallic Silver Super Fine Embossing Powder
- WOW Opaque Bright White Super Fine Embossing Powder
- WOW Clear Embossing Ink Pad
- Heat Resistant Acetate
- A3 White Card
- Craft UK A4 White Smooth Card
- Art Glitter Designer Dries Clear PVA Glue - 2oz Bottle
- Ex Large Jewels
- Tim Holtz Spiced Marmalade and Carved Pumpkin Oxide Ink Pads
- Chloes Creative Cards Foam Pads on a Roll - 3mm (1000 pads per roll)
- WOW Heat Tool
- Die Cutting Machine
- Score Board in MM

- Score and fold the A3 piece of card in half (21mm on large score board), place the largest Fancy Oval Die from the set just overlapping the score line, making sure that the die is length ways and die cut to make a fancy shaped card, using the card sideways score across the middle from point to point and fold forward, die cut a piece of white card with the same die and attach to the part that has been brought forward.
- Die cut 2 pieces of patterned paper from the Summer Meadow Paper pad using the second Ex Large Fancy Oval Die Set, glitter around the edges with Crystallina Sparkelicious and mat and layer onto the front and bottom of the base card.
- Using the fourth die in the Fancy Oval Set cut two in white card, mat and layer the bottom one flat and the top one with foam pads, die cut the fifth die in the Fancy Ovals set twice in patterned paper from the Summer Meadow Paper pad and glitter with Crystallina Sparkelicious and attach to the white fancy Oval Die cuts.
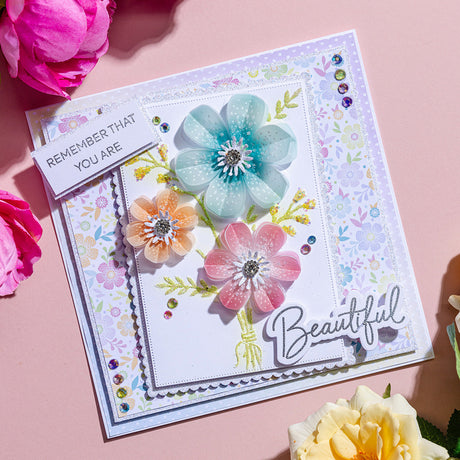
- Colour a large piece of white card using Spiced Marmalade and Carved Pumpkin Oxide Inks, heat set and then stamp and heat emboss the Delightful Daisy, die cut and glitter with the Razzle Dazzle Sparkelicious.
- Mould the petals into shape and attach to the base card with Collall 3D Glue Gel.
- Stamp the leaves onto Acetate in WOW Opaque Bright White Super Fine Embossing Powder and glitter with Disco Fever and Put on your Dancing Shoes when dry fussy cut and attach to the base card.
- Stamp and heat emboss the Birthday Wishes onto white card using WOW Metallic Silver Super Fine Embossing Powder and die cut with the banner die, dust the edges with the oxide ink and attach to base card with Collall 3D Glue Gel, glitter the large jewels with Disco Fever and when dry glue to the middle of the flowers.
- Die cut to small Fancy Oval shapes in white and stamp and heat emboss the Sentiment Stamps from the Delightful Daisy Stamp Set in WOW Metallic Silver Super Fine Embossing Powder on to the top one and for the bottom one leave the card in the die and colour with one of the oxide inks, mat and layer together and attach with foam pads.


