Hello Crafters,
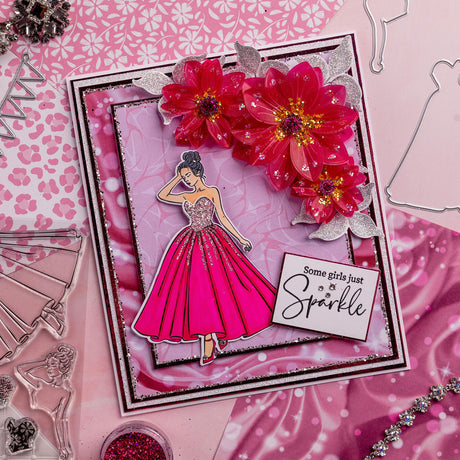
Our talented DT member, Glynis, created this pretty floral birthday card tutorial for you today. Glynis has used the brand-new Flower Builder collection to masterfully craft this delightful design that will brighten anyone's day.
Read on for a full step-by-step project tutorial, complete with a materials list that has been linked so you can click on each product to be sent to its respective web page, making it easy for you to shop.

YOU WILL NEED:
- Flower Builder collection:
- Stamp and die set – Amazing Beautiful Lovely Sentiment Builder
- Stamp and die set – Fresh Foliage
- 3D embossing folder, stamp and die set – Flower Swirl
- Scalloped and Pierced die set – DL
- 8x8” paper pad – Pastel Rainbow Delight
- Scalloped and Pierced die set – Rectangle
- Pearl card – Punch and Crystal White
- A4 paper pad – Leafy Lace
- Sparkelicious glitter – Crystallina, Diamante Sparkle and Absolutely Pink
- Sparklers – 10mm and 12mm
- Versafine Clair Black inkpad
- WOW! embossing powder – Clear Gloss
- Marker pens
- Burgundy bow
- Large jewel
- Pinflair 3D glue gel
- Foam pads on a roll
- Art Glitter Dries-clear PVA glue
- 7x10” white straight-edged card blank
- WOW! heat tool
- Die-cutting machine
INSTRUCTIONS:
1 Create three different-sized matts in Punch and Crystal White pearl card and coloured paper from the Leafy Lace pad. Go around the four sides of the Crystal White matt with Crystallina Sparkelicious glitter, then, once dry, matt and layer the three panels together and affix to the base card.
2 Using the Scalloped and Pierced DL die set, cut the first die from Crystal White card and the second die from Punch card. Glitter the edges of the white die-cut panel using Crystallina Sparkelicious glitter, matt and layer together, and secure to the base card with foam pads. On top of this layer, trim down a sheet of patterned paper from the Pastel Rainbow Delight paper pad, then glitter around the four sides using Diamante Sparkle Sparkelicious glitter before securing in place.
3 From the Scalloped and Pierced Rectangle die set, cut four different size matts, two scalloped from Crystal White pearl card and two stitch-edged from Punch pearl card. Go around the four sides of each white panel using Crystallina Sparkelicious glitter. Adhere the two largest die-cut panels together and secure onto the base card with foam pads. Matt and layer the two smaller ones together. Trim down a sheet of patterned paper from the Pastel Rainbow Delight pad, glitter around the four sides using Diamante Sparkle Sparkelicious glitter, then secure onto the smaller matt-and-layered panel and attach to the base card with foam pads.
4 Stamp, heat-emboss and die-cut the flowers from the Flower Swirl stamp and die set numerous times using Versafine Claire Black ink and Clear Gloss embossing powder onto white card. Colour with the marker pens and add Absolutely Pink Sparkelicious glitter. Shape the petals and adhere them together using Pinflair glue gel. Secure a large jewel using the Sparkles in the middle of each flower.
5 Stamp, heat-emboss, and die-cut the foliage from the Fresh Foliage stamp and die set, colour with grey marker pens, and add Diamante Sparkle Sparkelicious glitter. Secure onto the base card using Pinflair glue gel.
6 Stamp and heat-emboss the words using the Amazing Beautiful Lovely Sentiment Builder stamp and die set onto white card and then matt and layer onto Punch pearl card. Die-cut the largest die for the word Amazing in pearl card, cut the inner die in white card and glitter with Crystallina Sparkelicious glitter. Adhere together and secure all the sentiment pieces onto the base card with foam pads. Attach the large bow and jewel using Pinflair glue gel to finish.


Remember to share your creations on our Facebook and Instagram pages and follow us to keep up to date with all the latest news and collections.
Chloe x