YOU WILL NEED:
- 8x8” card blank
- Blooming Frames collection:
- Grande Summer Flower stamp and die set
- Dazzling Foliage stamp and die set
- Summer Foliage stamp and die set
- Lacy Tag stamp and die set
- Stamen die from Christmas Rose stamp and die set
- Rose Quartz pearl card and paper
- Rose Quartz matt mirror card
- Crystal White pearl card
- Self-Adhesive Sparkles – Pretty Pinks
- WOW! Opaque Bright White Superfine and Sparkling Snow embossing powder
- WOW! embossing inkpad – Clear
- Sparkelicious Glitter – Crystallina, Crystal Crush and Unicorn Sparkle
- Chloe’s Creative Cards 3D foam pads
- Pinflair 3D glue gel
- Art Glitter Dries-Clear PVA Glue with fine-tip nozzle
- Double-sided adhesive sheets
- Chloe’s Creative Cards Chisel-tip Glue Pen
- Heat-resistant acetate
- Heat gun
- Die-cutting machine
INSTRUCTIONS:
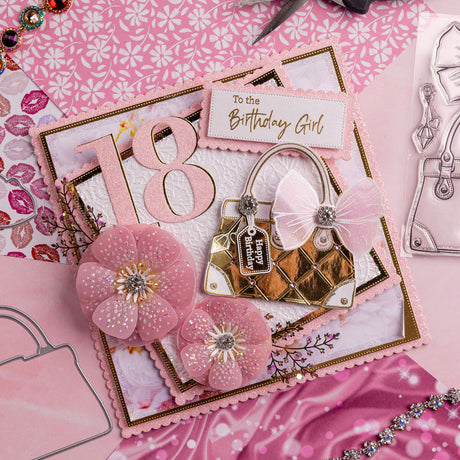
1 Trim a sheet of Rose Quartz matt mirror card to 7¾” square and a sheet of Rose Quartz pearl card to 7½” square then glitter the edges with Crystallina Sparkelicious glitter. Matt and layer both pieces to the base card with foam pads.
2 Trim another sheet of Rose Quartz Pearl card to roughly 7” square and, using the main Floral Lace Border die and one edger die, cut into one side of the card. Once you’ve lined up the edger die beside the panel die, secure with low-tack tape to run through die-cutting machine to stop the die from moving and give you a neat edge.
3 Repeat step 2 at the other end of the Rose Quartz card by moving the panel die down around 2¼” from the edge of the first floral panel. Again, just cut one outer edge with the edger die and secure with low-tack tape to run through the die-cutting machine. You should now have a lovely delicate edge at either end of the pink card with a flat uncut panel in between. Trim your die cut panel to 7¼” wide.
4 Trim White Crystal pearl card to 7¼” square and attach a sheet of double-sided adhesive to the front. Place your pink die-cut panel onto the adhesive sheet leaving an even gap at the top and bottom. Cover the whole of the remaining exposed adhesive with Crystallina Sparkelicious glitter. Attach this layer to your card using foam pads.
5 Take a piece of Rose Quartz matt mirror card and trim to 7¼x2¾” then cut a 7¼x2½” piece of Rose Quartz pearl card. Cut a coordinating piece of paper from the Floral Dreams paper pad (the pink butterfly design has been used here) to 7¼x2¼”. Using the Chisel-tip glue pen, glitter the edges of both the pink and patterned layers with Crystallina Sparkelicious glitter. Matt and layer all three panels using 3D foam pads and attach across the centre of your base card.
6 Using Rose Quartz pearl paper, stamp and emboss the Grande Summer Flower three times with your WOW! Clear inkpad and WOW! Sparkling Snow embossing glitter. Die-cut the flowers using the die from the set. Stamp another Grande Summer Flower onto heat-resistant acetate and fussy cut. Add tiny dots of Art Glitter PVA glue with the fine-tip nozzle onto the petals of the acetate flower and sprinkle with Unicorn Sparkle Sparkelicious glitter. Adhere the flower layers together with 3D glue gel. Die-cut stamens from the Christmas Rose stamp and die set using a piece of Rose Quartz matt mirror card and glitter the tips with Unicorn Sparkle Sparkelicious glitter. Attach the stamens to the flower with 3D glue gel, add a gem to the centre, and affix to the centre of your card.
7 Stamp three large swirls from Summer Foliage stamp and die set and three leafy branches from Dazzling Foliage onto heat-resistant acetate then emboss with WOW! Sparkling Snow embossing glitter. Fussy cut the foliage. Using the Art Glitter fine-tip nozzle, add glue to the reverse of the leaves on the leafy branches and coat with Crystal Crush Sparkelicious glitter. Leave these to dry before arranging the foliage around your flower and attaching with 3D glue gel.
8 Die-cut the middle-sized lacy tag twice from Rose Quartz matt mirror card and pearl card. Stamp a sentiment from the same stamp and die set and emboss with WOW! Opaque Bright White Superfine embossing powder. Edge the pearl pink layer with Crystallina Sparkelicious glitter and matt and layer with the matt mirror layer using foam pads.
9 Tuck the layered tag under the flower and attach at the bottom with a 3D foam pad. Finish by adding Pretty Pinks Self-Adhesive Sparkles to the acetate swirls and floral die-cut areas.


4 comments
What a stunning card love the pastel colours
Absolutely gorgeous 😍 can’t wait for my set to arrive, thank you Chloe and team for your inspirations ❤️
Fabulous tutorial. I can’t wait untill my set arrives. I am going to be soooooo busy. Thankyou Chloe and Corine.
Regards Ann Toppcards
An absolutely beautiful card, so very pretty. X